> ## Documentation Index
> Fetch the complete documentation index at: https://amethyst.geoxor.moe/llms.txt
> Use this file to discover all available pages before exploring further.
# Android
## Setting up environment
Follow the cloning procedure stated in [Development](/guides/development)
#### Windows
Install [Adoptium JavaJDK 21](https://adoptium.net/temurin/releases/?version=21\&os=any\&arch=any)
Make sure to enable `Add JAVA_HOME to PATH` during installation.
#### MacOS
```bash theme={null}
brew install openjdk@21
sudo ln -sfn /opt/homebrew/opt/openjdk@21/libexec/openjdk.jdk /Library/Java/JavaVirtualMachines/openjdk-21.jdk
echo 'export PATH="/opt/homebrew/opt/openjdk@21/bin:$PATH"' >> ~/.zshrc
```
#### Linux
```bash arch theme={null}
pacman -s jdk21-openjdk
```
```bash debian theme={null}
apt install openjdk-21-jre-headless
```
```bash fedora theme={null}
dnf install java-21-openjdk
```
Install [Android Studio](https://developer.android.com/studio/archive)
Make sure to download Meerkat Feature Drop | 2024.3.2 from the page
Add these paths to your environment variables
```powershell theme={null}
C:\Users\$USER\AppData\Local\Android\Sdk\emulator
C:\Users\$USER\AppData\Local\Android\Sdk\platform-tools
```
Create a virtual emulator device on Android Studio
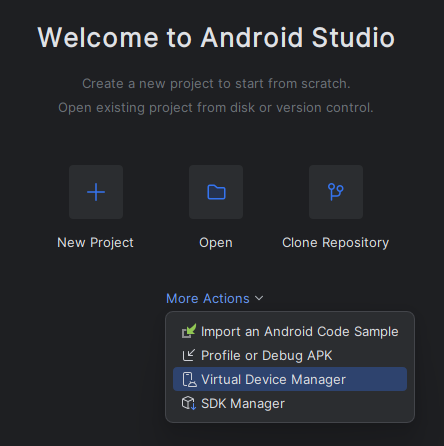 or connect your android phone to your computer with USB debugging enabled from Developer settings.
Generate a keystore by running the command and following the instructions
```bash theme={null}
keytool -genkey -v -keystore debug.keystore -alias key0 -keyalg RSA -keysize 2048 -validity 10000
```
Rename the empty `example.env` to `.env` in the project root
```ini theme={null}
KEYSTORE_PATH=
KEYSTORE_PASSWORD=
KEY_PASSWORD=
KEY_ALIAS=
NODE_ENV=development
```
and fill the example values according to the instructions
You can run the `pwd` command to get the current absolute path of the folder for keystore
## Running the app
Start the Vite development server
```sh theme={null}
yarn start:renderer
```
Start the Capacitor development app
```sh theme={null}
yarn cap run android -l --port 6969 --host 127.0.0.1 --forwardPorts 6969:6969
```
The following command will promt you for device selection, select your Emulator or real device and it will install and launch the development app
## Debugging (via ADB)
You can see the debug logs with ADB
```bash theme={null}
adb shell 'logcat --pid $(pidof moe.geoxor.amethyst)'
```
## Debugging (via Devtools)
Devtools can be launched in the target device, follow [these steps to see how](https://capacitorjs.com/docs/vscode/debugging#use-chrome-inspect)
or connect your android phone to your computer with USB debugging enabled from Developer settings.
Generate a keystore by running the command and following the instructions
```bash theme={null}
keytool -genkey -v -keystore debug.keystore -alias key0 -keyalg RSA -keysize 2048 -validity 10000
```
Rename the empty `example.env` to `.env` in the project root
```ini theme={null}
KEYSTORE_PATH=
KEYSTORE_PASSWORD=
KEY_PASSWORD=
KEY_ALIAS=
NODE_ENV=development
```
and fill the example values according to the instructions
You can run the `pwd` command to get the current absolute path of the folder for keystore
## Running the app
Start the Vite development server
```sh theme={null}
yarn start:renderer
```
Start the Capacitor development app
```sh theme={null}
yarn cap run android -l --port 6969 --host 127.0.0.1 --forwardPorts 6969:6969
```
The following command will promt you for device selection, select your Emulator or real device and it will install and launch the development app
## Debugging (via ADB)
You can see the debug logs with ADB
```bash theme={null}
adb shell 'logcat --pid $(pidof moe.geoxor.amethyst)'
```
## Debugging (via Devtools)
Devtools can be launched in the target device, follow [these steps to see how](https://capacitorjs.com/docs/vscode/debugging#use-chrome-inspect)